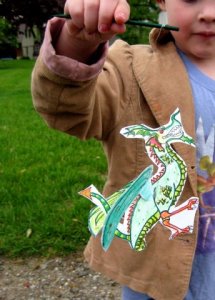
Here’s another fun flying toy that we made a few weeks ago…a DRAGON. I would have provided more photos of the finished project, but we immediately gifted it to our 7-yr-old neighbor for his birthday as soon as it was finished. Makes a fine present to make with the help of a child….
This is the first flying toy that we’ve made using florist’s pick and wire as a handle. You can usually find the florist picks anywhere that sells dried flowers. They work wonderfully as a handle for the flying paper toys found on this blog.
The pdf files you’ll need to download to make this nifty little toy: dragon_toy_pdf
What is contained: one wyvern-style dragon design and wings in two sizes, largest size printing to an 8.5 ” x 11 ” piece of paper. This wyvern is based on the drawing instructions found in Ralph Masiello’s Dragon Drawing Book. I found it at my local library and thought that the instructions were clear and easy enough to follow.
What you’ll need: markers and crayons or paint, glue (scrapbooker’s fast-drying is best), string, florists pick with wire or popsickle sticks to hang the dragons with or use as handles, scissors, 8.5′ x 11″ card stock, and, although not necessary, sparkly glitter, stickers or the like is highly recommended.
1. Pick your dragon and pick your wing pair. Color ‘em in. We used crayons and markers because they were on hand. Add glitter, sequins and bits of what not. Depending on your inclination, you may choose to make each component a mirror image of it’s partner or you may go for the daring separate size look. Coloring mirror images is a good, challenging task for young children in particular. Choosing to make separate sides different is quite daring for most older people.
2. Cut the components out, leaving a generous outer perimeter around tight areas such as feet and hands. This is rather tricky cutting for the very young but should be managble for adults and older children.
3. Glue the blank sides of your dron bodies together, matching them together as closely as possible. Hold the two pieces up to a light or window to help align the dark lines. Our dragons wanted to bend a bit as they dried, so we pressed them between a stack of heavy books as they dried. I used a higher quality scrapbooker’s glue stick and it worked great. School glue was a bit too gloppy and “wet.”
4. Take a look at your wings and think a bit about how you want them positioned on the dragon’s body. For instance, if you want the dragon to be attached to a string and flying above you, you’ll probably want the colored side of the wings to face towards the ground. Color both sides of the wings for extra panache. Fold the tabs of the wings at the , angling to get the tilt you desire.
5. When the dragon body is dry, attach the wings by glueing/taping the wing tab in place. For our needs (we tend to really play with our toys) both glue and tape were necessary.
6. Attach string, wire, snazzy straws, popsickle sticks, pipe cleaners…..for this particular toy, we used florist picks with wires…you’ll want some sort of handle or cord so that you can play with the dragon or display it.
